Host Java Web Application via Mobile Phone free using Tomcat and Termux

Learn How to Host a Java Web Application via Mobile Phone for Free with Tomcat and Termux. Hosting a Java web application doesn’t have to involve expensive infrastructure. With just your mobile phone, Tomcat, and Termux, you can create a fully functional server to deploy your web applications . This guide will show you exactly how to set up and configure your environment, making it easy to host your applications from anywhere.
If you want to make your website live just for demo purposes, AWS can become costly. While there’s a free tier, there are sometimes hidden costs, and you might end up accidentally using a service that’s not covered by the free tier, leading to unexpected charges.
So, hosting it on your old phone with Termux makes way more sense especially with Cloudflare’s local tunnel, it’s even easier since you’re not dependent on a static public IP.
To host a Java web application on a mobile phone, follow these steps:
- Install and Configure SSH on Termux
- Install Java
- Install MariaDB
- Install Tomcat
- Set up Cloudflare nameservers
- Configure the Cloudflare CLI
- Set up storage for uploaded data
- Make a simple bash script to start all the services
- Running the services
Step 1: Configure SSH on Termux
- First, download Termux from the Play Store or F-Droid.
- Run this command to update and upgrade the available packages in Termux.
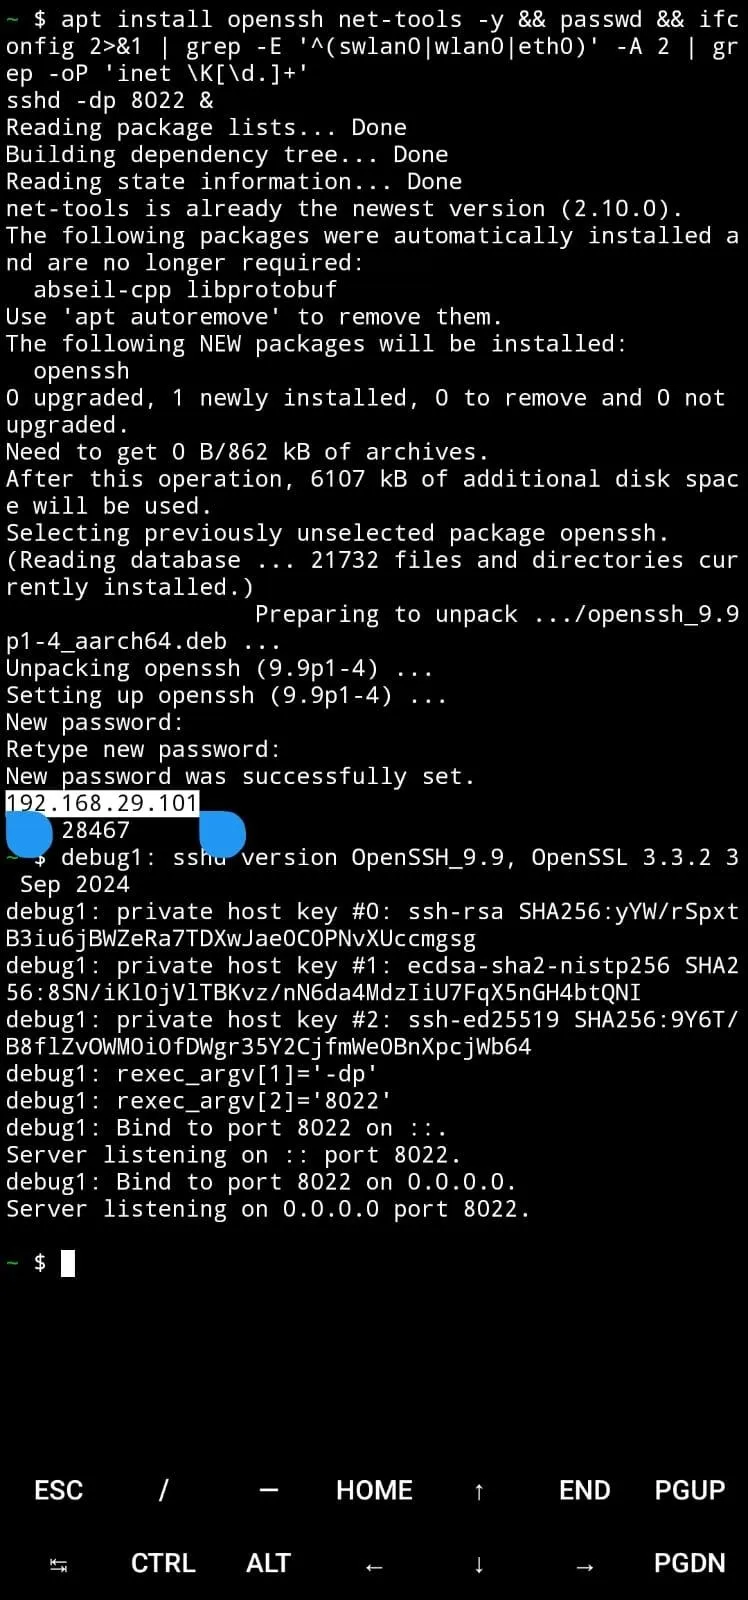
apt update && apt upgrade -y - For convenience, we’ll connect Termux to the laptop to begin the next steps. Install OpenSSH using the command given below and set the user password and confirm. This will start a SSH server and will show the private IP of your device. We will need this IP to connect it from laptop later.
Remember, both devices need to be on the same network. Either connect your laptop to your mobile hotspot or ensure both devices are on the same Wi-Fi network.
apt install openssh net-tools -y
passwd && ifconfig 2>&1 | grep -E '^(swlan0|wlan0|eth0)' -A 2 | grep -oP 'inet \K[\d.]+'
sshd -dp 8022 &
- Now that we have started the SSH server and know the IP of the phone, it’s time to connect it to the laptop. But before connecting, make sure the OpenSSH client is installed.
Installing OpenSSH Client:
- Windows 10/11:
Go to Settings > System > Optional Features, search for OpenSSH Client, select it, and click Install.
In Windows 10, you may need to go to Settings > Apps & Features > Optional Features. - Windows <10:
Download Git for Windows to get Git Bash with OpenSSH support. - Linux:
OpenSSH is likely already installed, and if not, you can run this command apt install openssh-client.
- Windows 10/11:
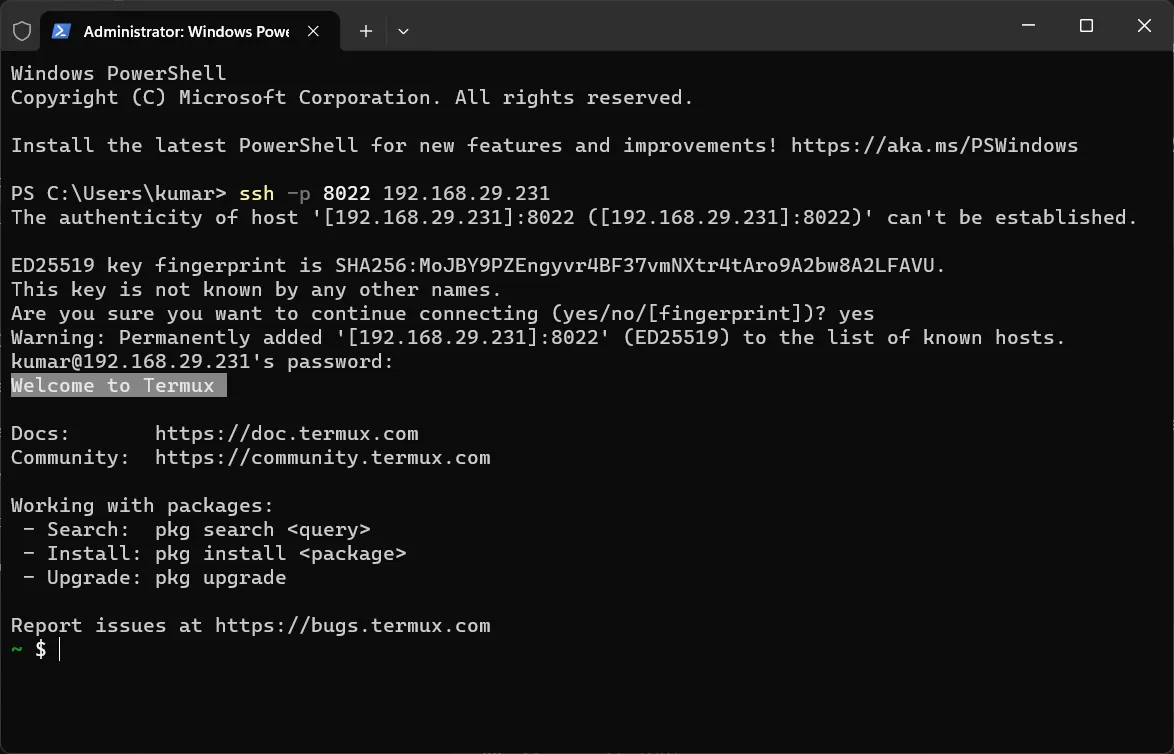
- So, next open your laptop terminal and run the below command to connect. We’re using port 8022 because lower ports, including the default SSH port 22, are reserved for the root user and the IP we’re using here is the one we got from Termux from the previous step.1ssh -p 8022 192.168.29.231
- Since this is our first connection, we may see a message about the host’s authenticity. Type Yes and press Enter. It will then prompt you for the password (the one you set in the last command). Enter the password and press Enter again.

- We’re now connected to Termux from the laptop terminal, so we’ll run the next commands directly from here.
Step 2: Downloading JDK and configuring it
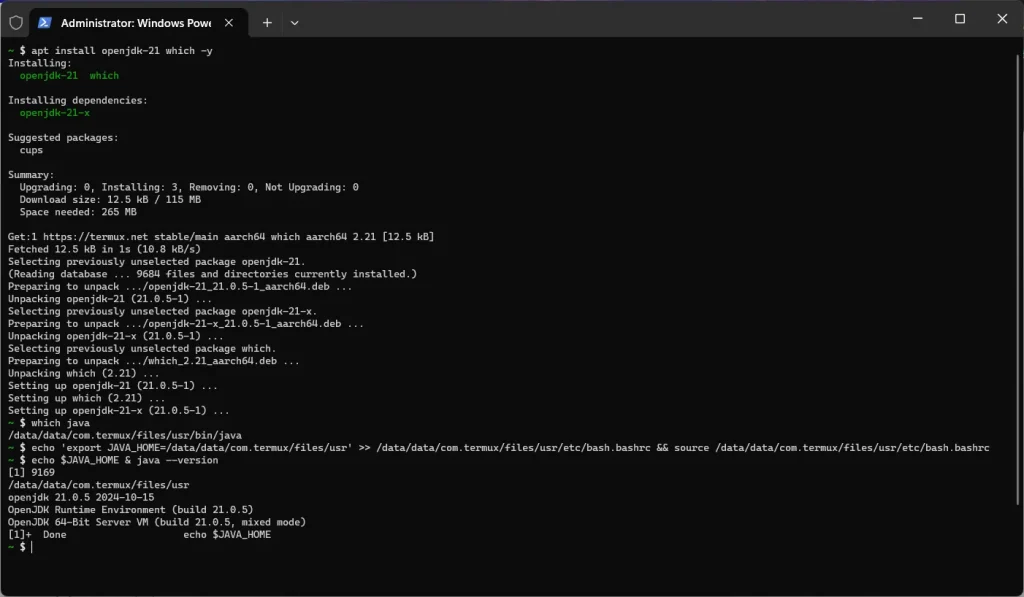
- Now, we need to Install OpenJDK 21 (or any version of your choice) and which by running the command apt install openjdk-21 which -y
- Check where Java is installed by running which java. In my case, it was located at /data/data/com.termux/files/usr/bin/java, so the JAVA_HOME path will be /data/data/com.termux/files/usr.
- Next, add the JAVA_HOME path to the bash.bashrc file and reload it with the below command.
echo 'export JAVA_HOME=/data/data/com.termux/files/usr' >> /data/data/com.termux/files/usr/etc/bash.bashrc && source /data/data/com.termux/files/usr/etc/bash.bashrc - You can verify using – echo $JAVA_HOME & java --version
Step 3: Installing MariaDB (forked version of MySQL)
We, now need a database to store our textual data, we will be using MariaDB which is the forked version of MySQL.
- Install MariaDB by running the command apt install mariadb.
- Now we will create a new user for our web application on our MySQL server.
- To do this, start the server and log into the MariaDB
mariadbd-safe & /data/data/com.termux/files/usr/bin/mariadb -u root - Then, run the following commands:
CREATE USER 'eshop'@'localhost' IDENTIFIED BY 'eshop6201'; GRANT ALL PRIVILEGES ON *.* TO 'eshop'@'localhost' WITH GRANT OPTION; FLUSH PRIVILEGES; EXIT; - So, we have created a new user named eshop and now we will login into it.
/data/data/com.termux/files/usr/bin/mariadb -u eshop -p - It will prompt you for a password (e.g., eshop6201) – input it and press Enter.
- After logging in, create a new database named ecommercedb
CREATE DATABASE ecommercedb;
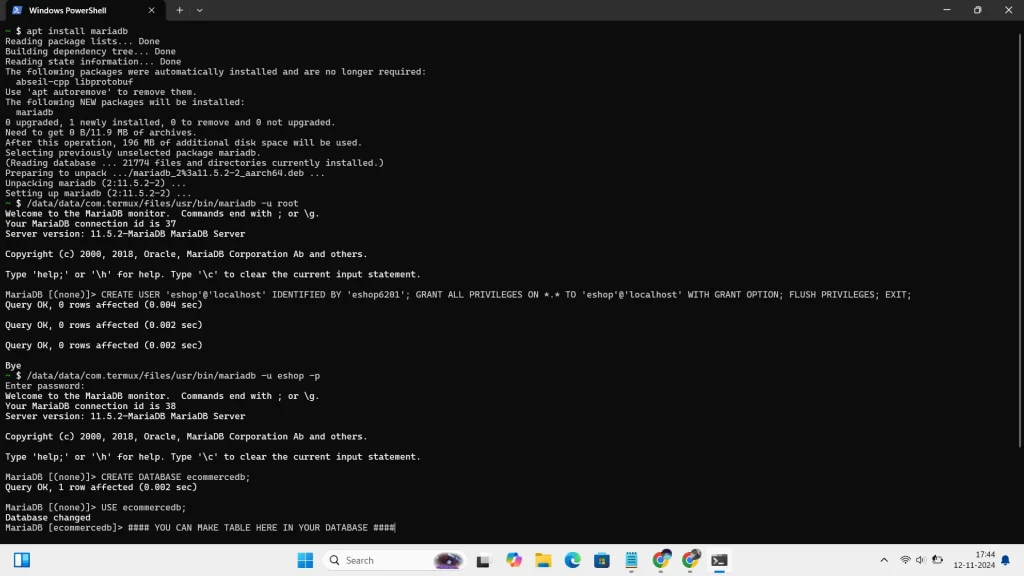
Note: We are using an ORM (Object-Relational Mapping) in our project, so we’ll leave it here, as the ORM will handle the creation of our tables based on your models. If you want to create tables manually, you can run the appropriate SQL commands after creating the database.
Remember to use the MariaDB connector with JDBC in your web-app application. For this you can use this dependency in your Maven managed pom file: mariadb-java-client or if you aren’t using any build tools, you can download its jar file.

Driver: org.mariadb.jdbc.Driver (You can explicitly load this driver class in case it is not automatically getting loaded.)
JDBC URL: jdbc:mysql://localhost:3306/ecommercedb (Remember to replace ecommercedb with your actual database name)

Step 4: Configuring Tomcat (10.1.24)
Now, to serve our Java based web application we need to have Tomcat installed.
To do this, we need to manually download the archive of a specific version of Apache Tomcat.
So, I’m going to download version 10.1.24 as this one has support for the Jakarta namespace which we are using in our project.
For simplicity, we’ll set up Tomcat in our home directory.
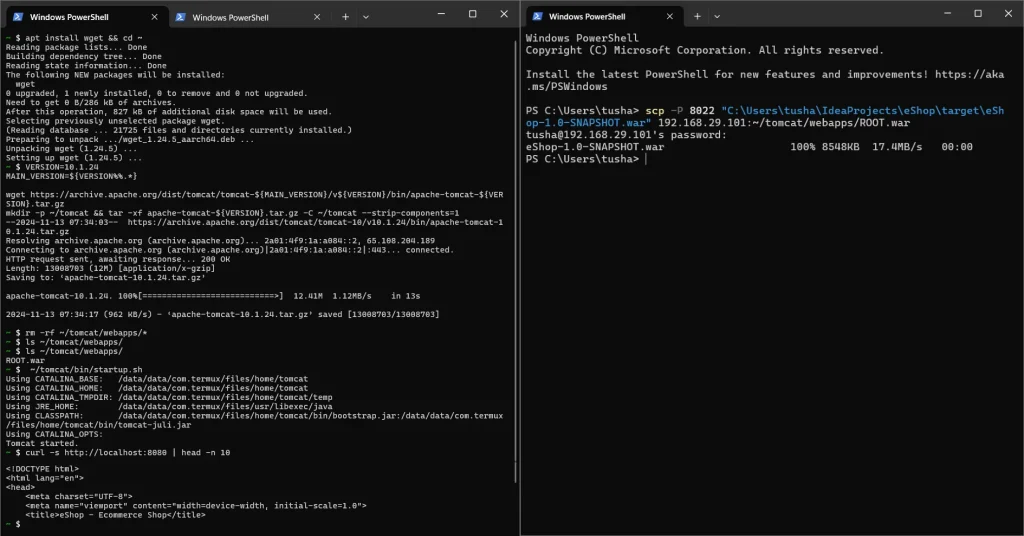
1 2 3 4 5 6 7 | apt install wget && cd ~ VERSION=10.1.24 MAIN_VERSION=${VERSION%%.*} wget https://archive.apache.org/dist/tomcat/tomcat-${MAIN_VERSION}/v${VERSION}/bin/apache-tomcat-${VERSION}.tar.gz mkdir -p ~/tomcat && tar -xf apache-tomcat-${VERSION}.tar.gz -C ~/tomcat --strip-components=1 |
We’ll remove the default application and its related files and folder from the Tomcat webapps directory so that we could have our own web application files.
rm -rf ~/tomcat/webapps/*
Now, we need to transfer our WAR file to the Termux environment inside ~/tomcat/webapps/. To do this, open a new terminal (outside of Termux SSH) and run the following command:
scp -P 8022 "C:\Users\tusha\IdeaProjects\eShop\target\eShop-1.0-SNAPSHOT.war"
192.168.29.101:~/tomcat/webapps/ROOT.war
The above command renames your WAR file to ROOT.war on copy, allowing Tomcat to serve it as the default web app and automatically unzip it on startup.
You can verify if the transfer was successful by running
ls ~/tomcat/webapps/.
We will also start Tomcat to check if it is serving our web app on localhost:8080 successfully.
To do this, we’ll use the command
~/tomcat/bin/startup.sh
Once Tomcat is started, we can curl localhost:8080 to check if our webpage is loading by using
curl -s http://localhost:8080 | head -n 10
[Note: You can’t open this on your laptop because it is serving on the localhost of your smartphone in which Termux is running]
As you can see, our page HTML is successfully displaying in the terminal.
Step 5: Setting up Cloudflare nameservers
In the previous step we made our web application running on localhost but it is still not accessible over the internet.
To expose our localhost on the internet, we first need to have a domain and a Cloudflare account.
Let’s assume we already have a domain e.g., webspacehub.in set up in our Hostinger account. You can have one from another provider like Namecheap or GoDaddy too.
Each provider gives you default nameservers, but we’ll need to replace them with Cloudflare’s nameservers to use its tunnel service.
This tunnel service will allow us to expose our Tomcat server running on localhost to the internet without needing a static private IP.
To do this, first we will change the default nameservers with Cloudflare one in our domain account –
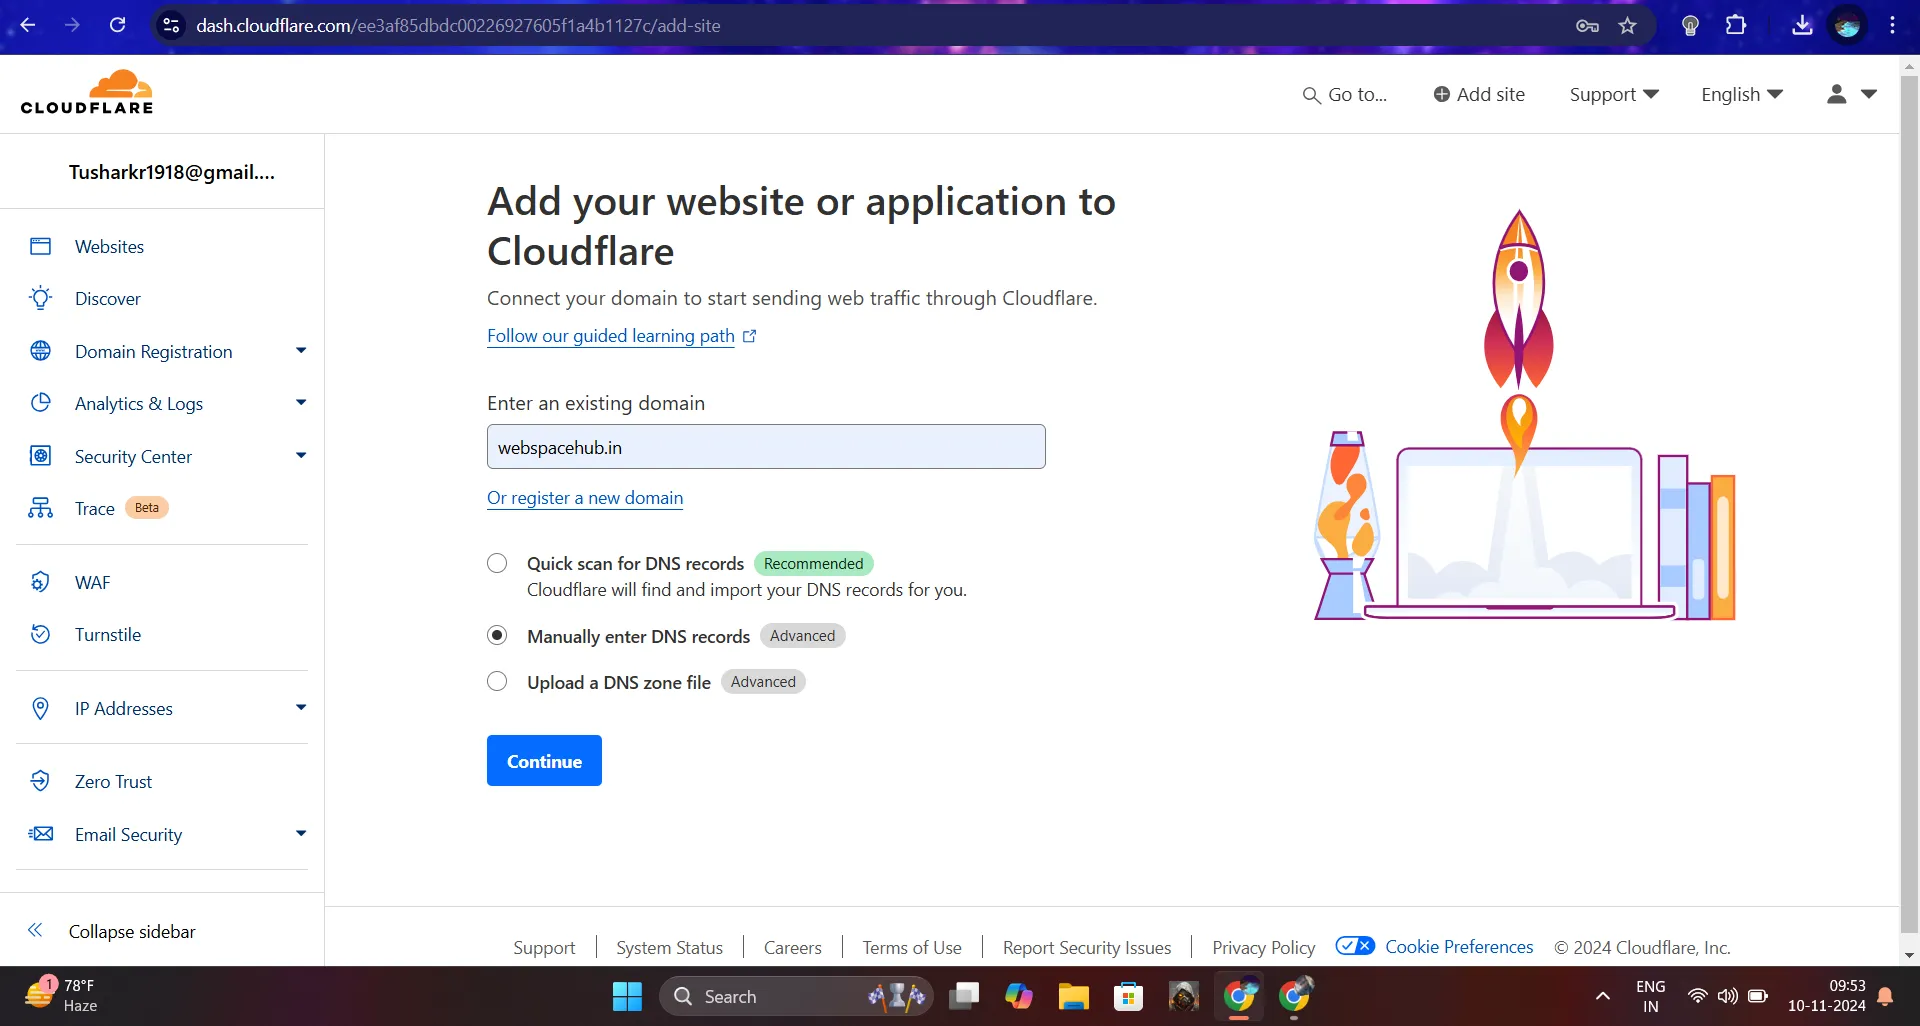
- Make a Cloudflare account if you don’t have one, sign up at Cloudflare. After signing up, click on Add a Site, enter your domain name, and select the option to “Manually enter DNS records.

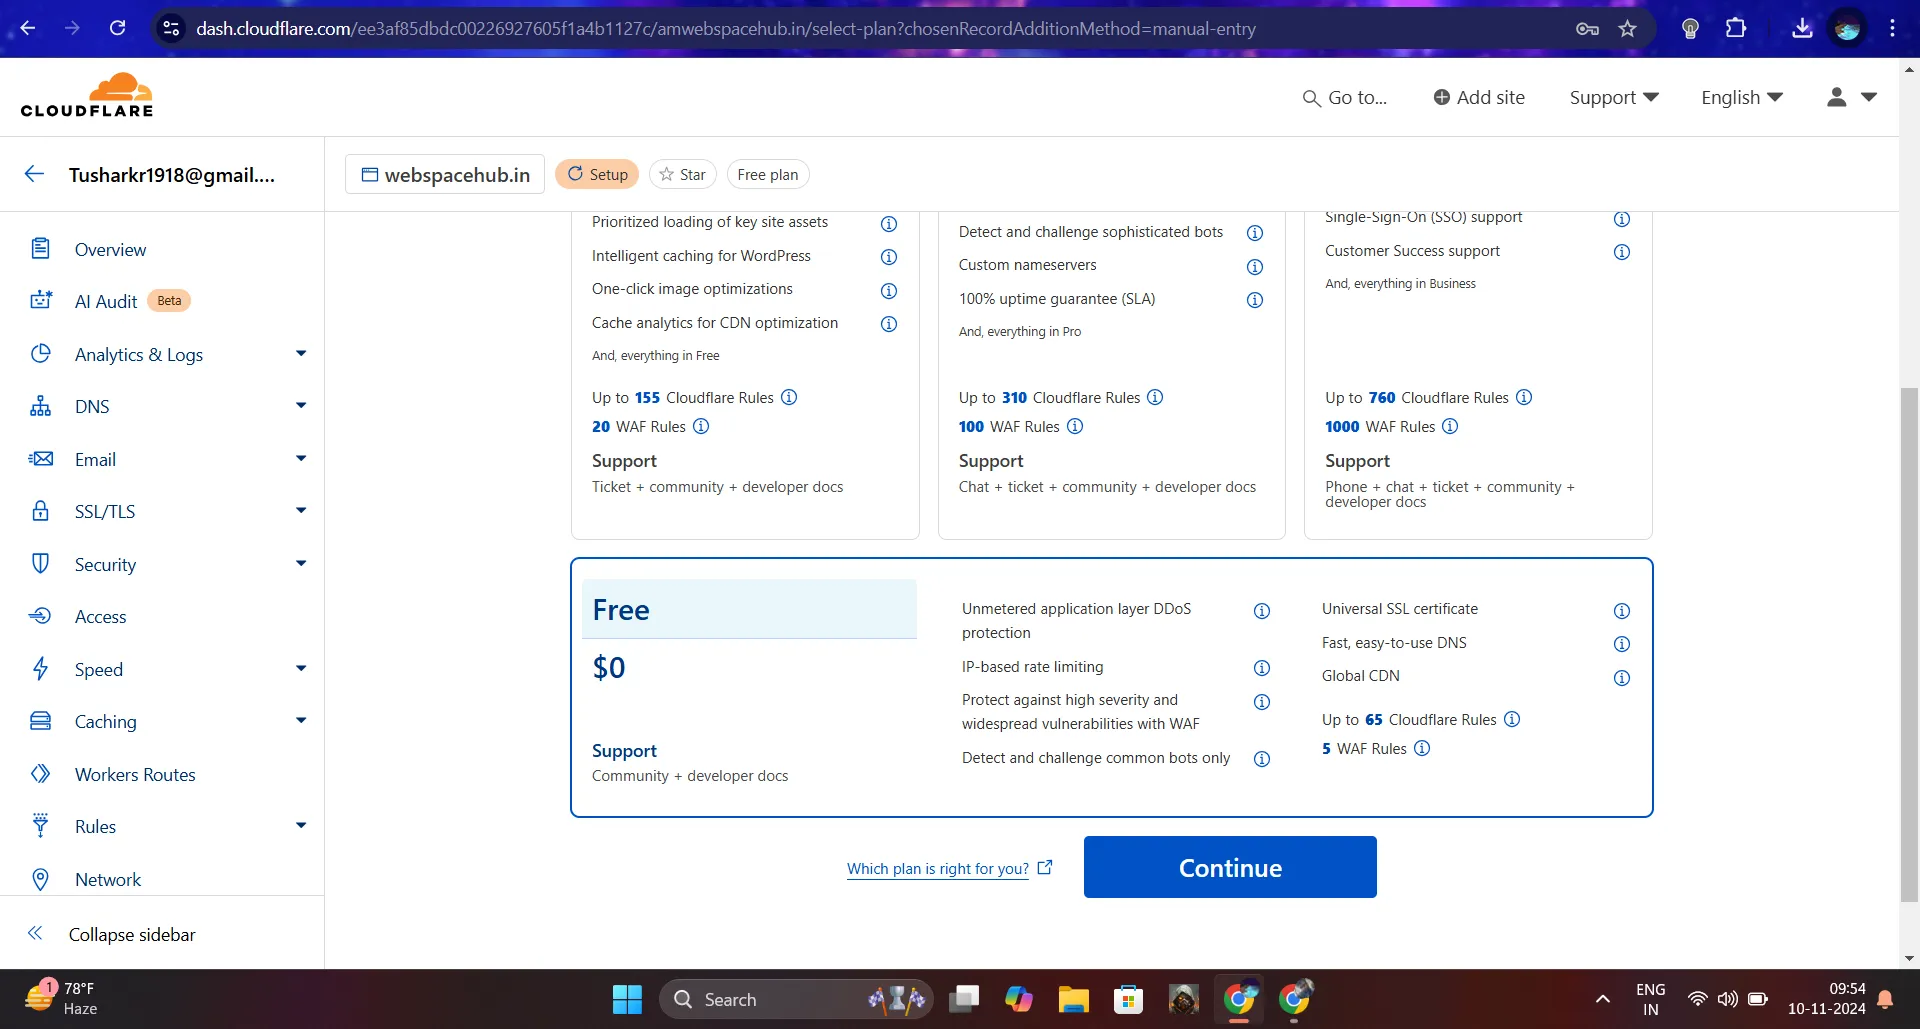
- Now, click on ‘Continue’, select the ‘Free’ plan, and click ‘Continue’ again.

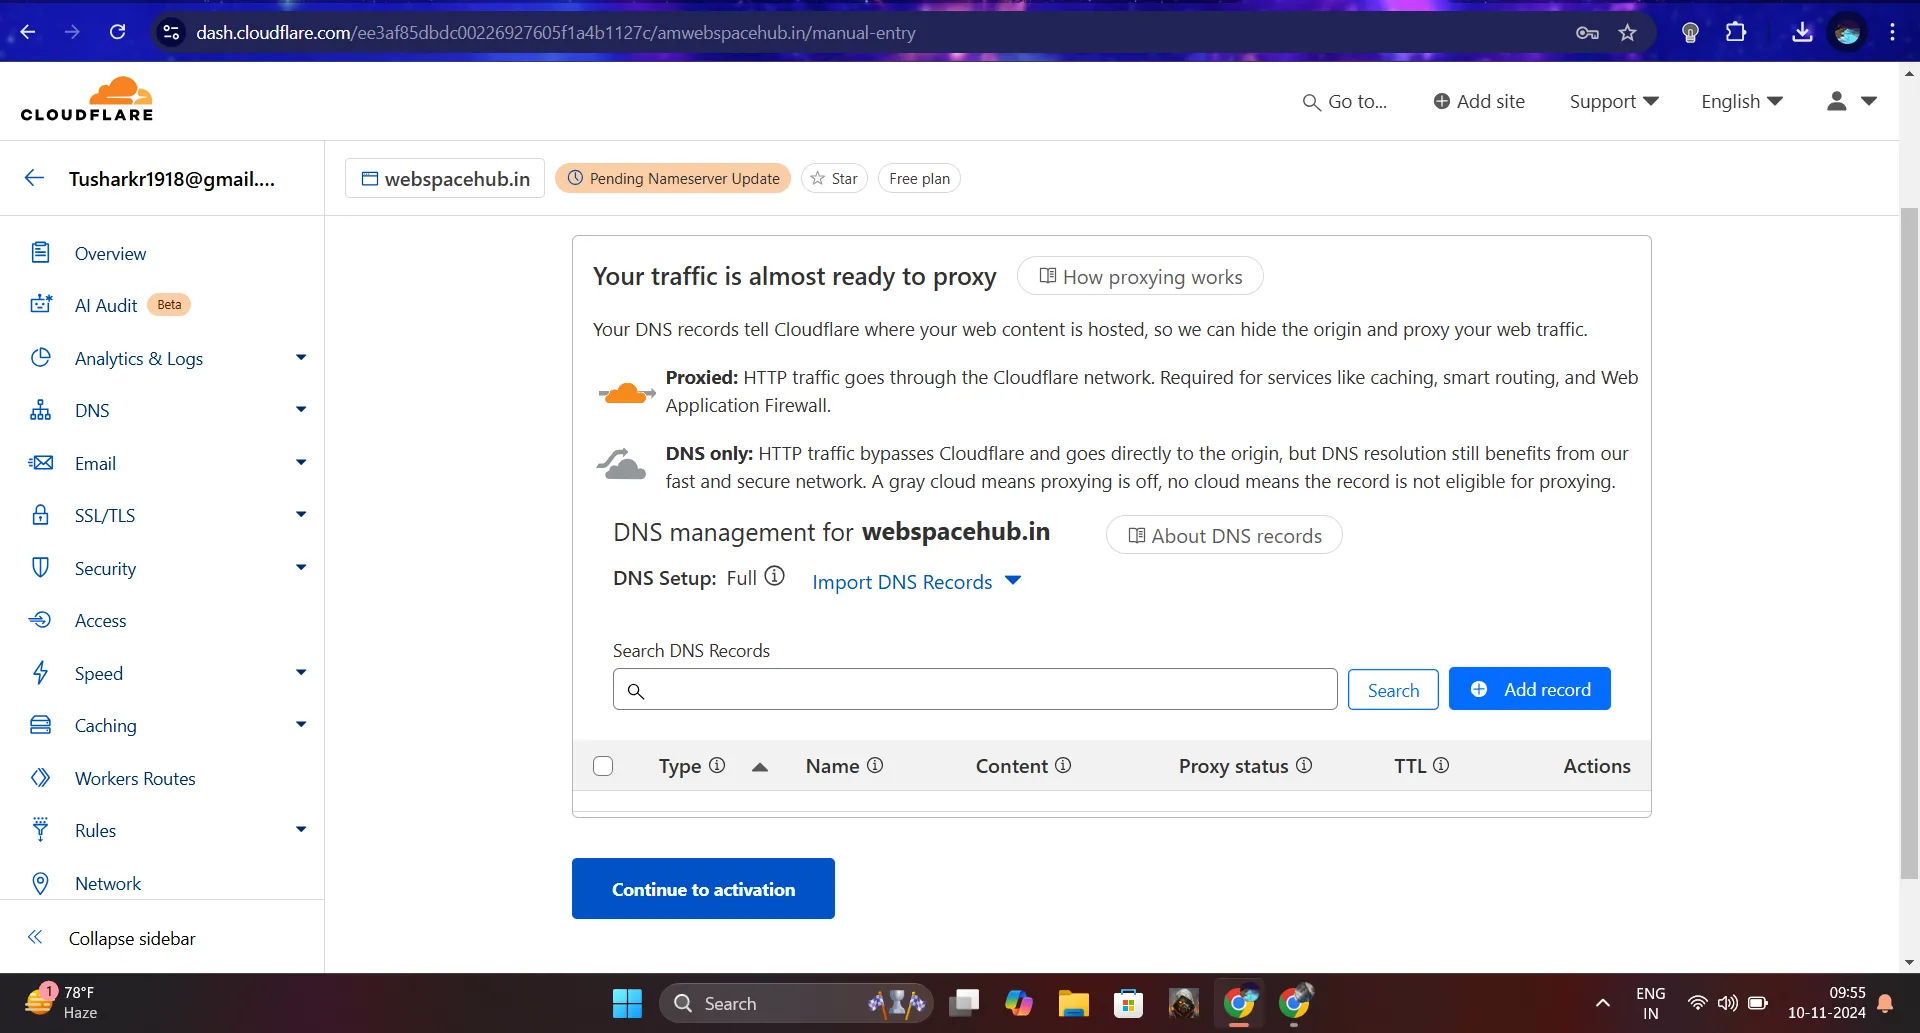
- It will now allow you to add DNS records for your domain, but leave it as is and click ‘Continue to activation’. It will then prompt you with ‘Add records later’; click on ‘Confirm’.

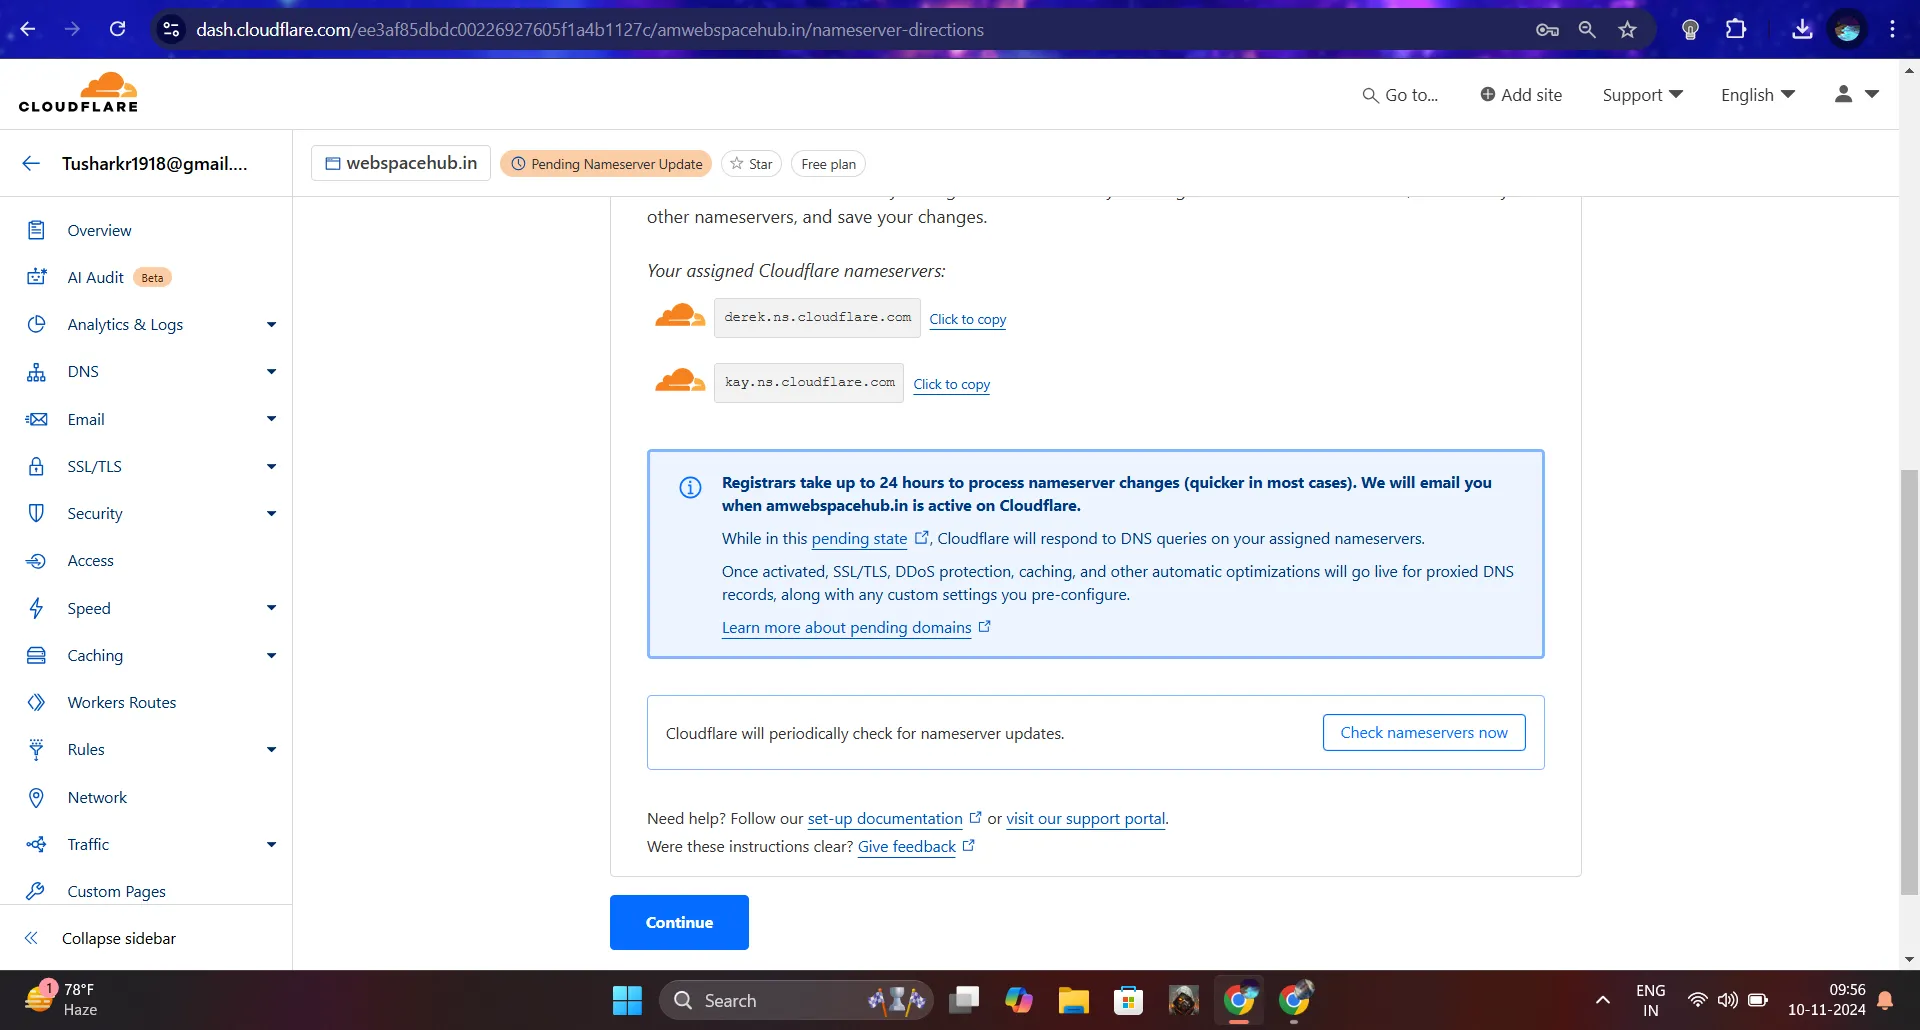
- Now, you will see two Cloudflare nameservers (e.g., derek.ns.cloudflare.com, kay.ns.cloudflare.com) assigned to your domain. Copy both of them and click on ‘Continue’ once again.

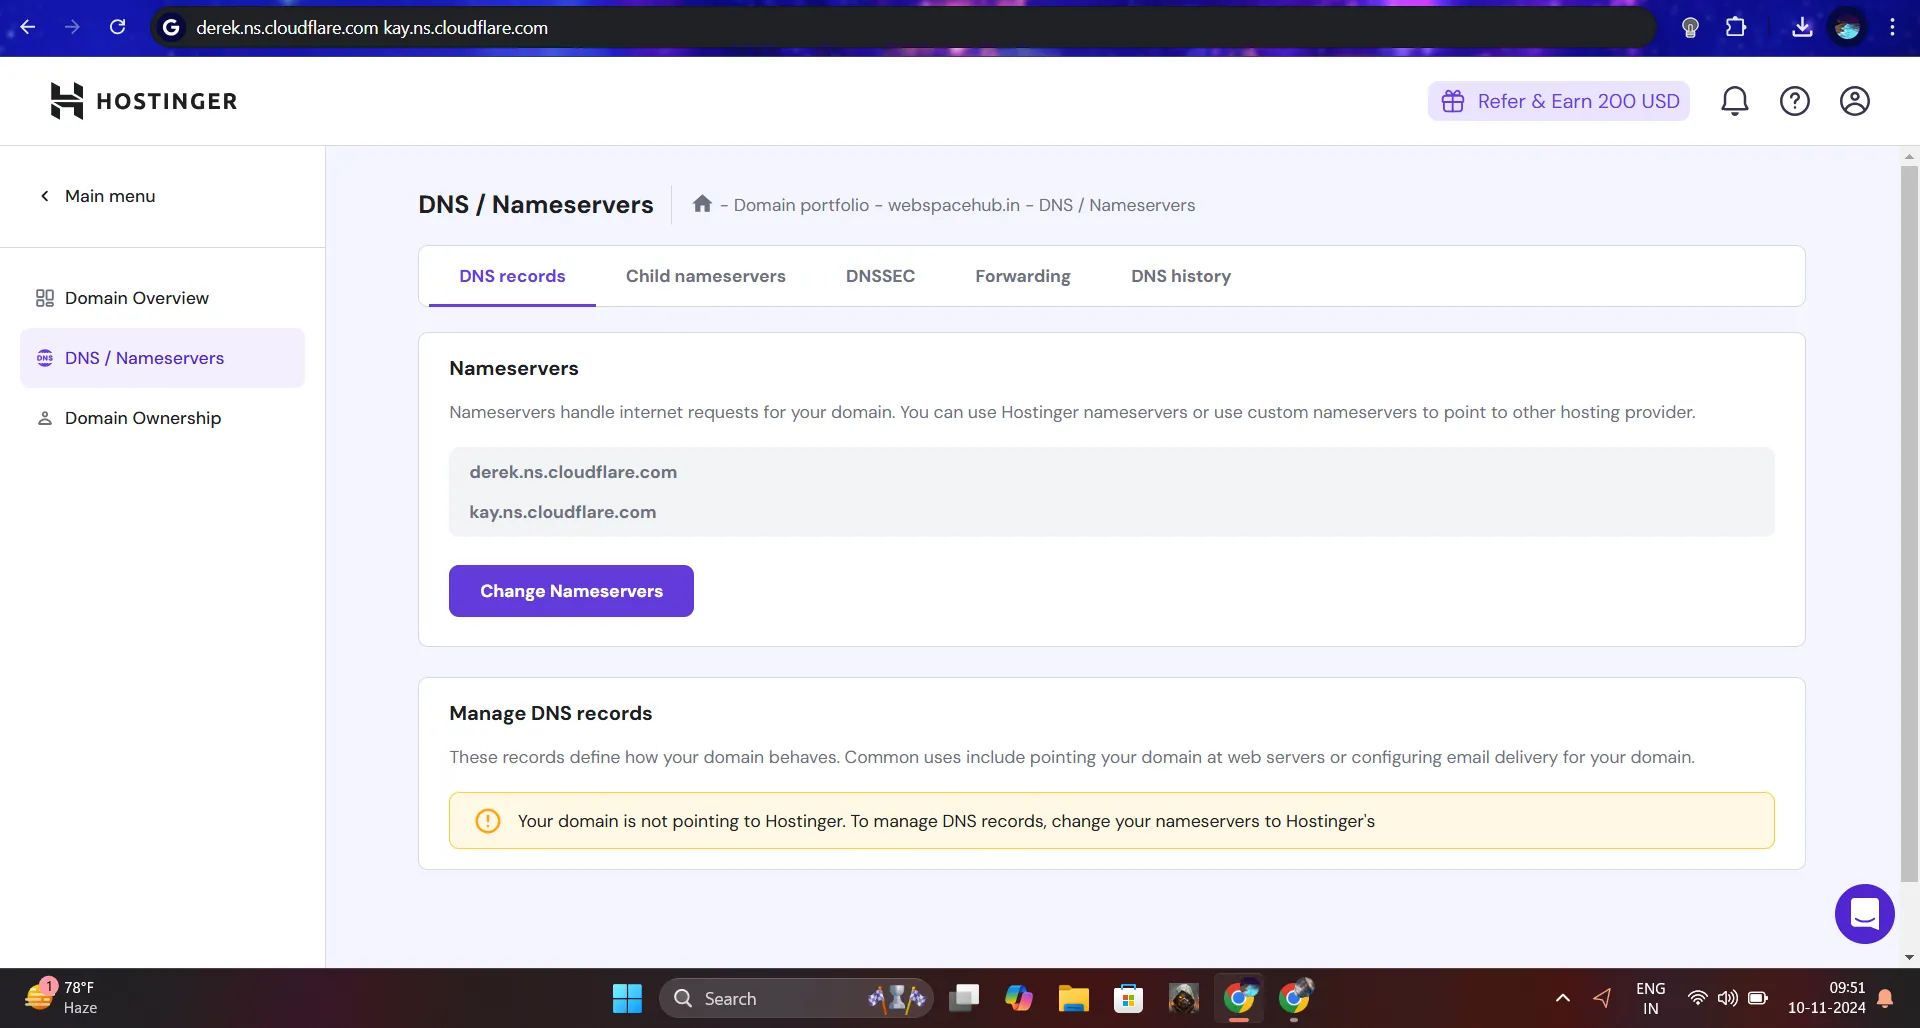
- So, we’ve got the Cloudflare nameservers. Next, in a new tab of your browser, log into your Hostinger or any other domain provider account, find the nameservers section, and select the option to change or use custom nameservers.

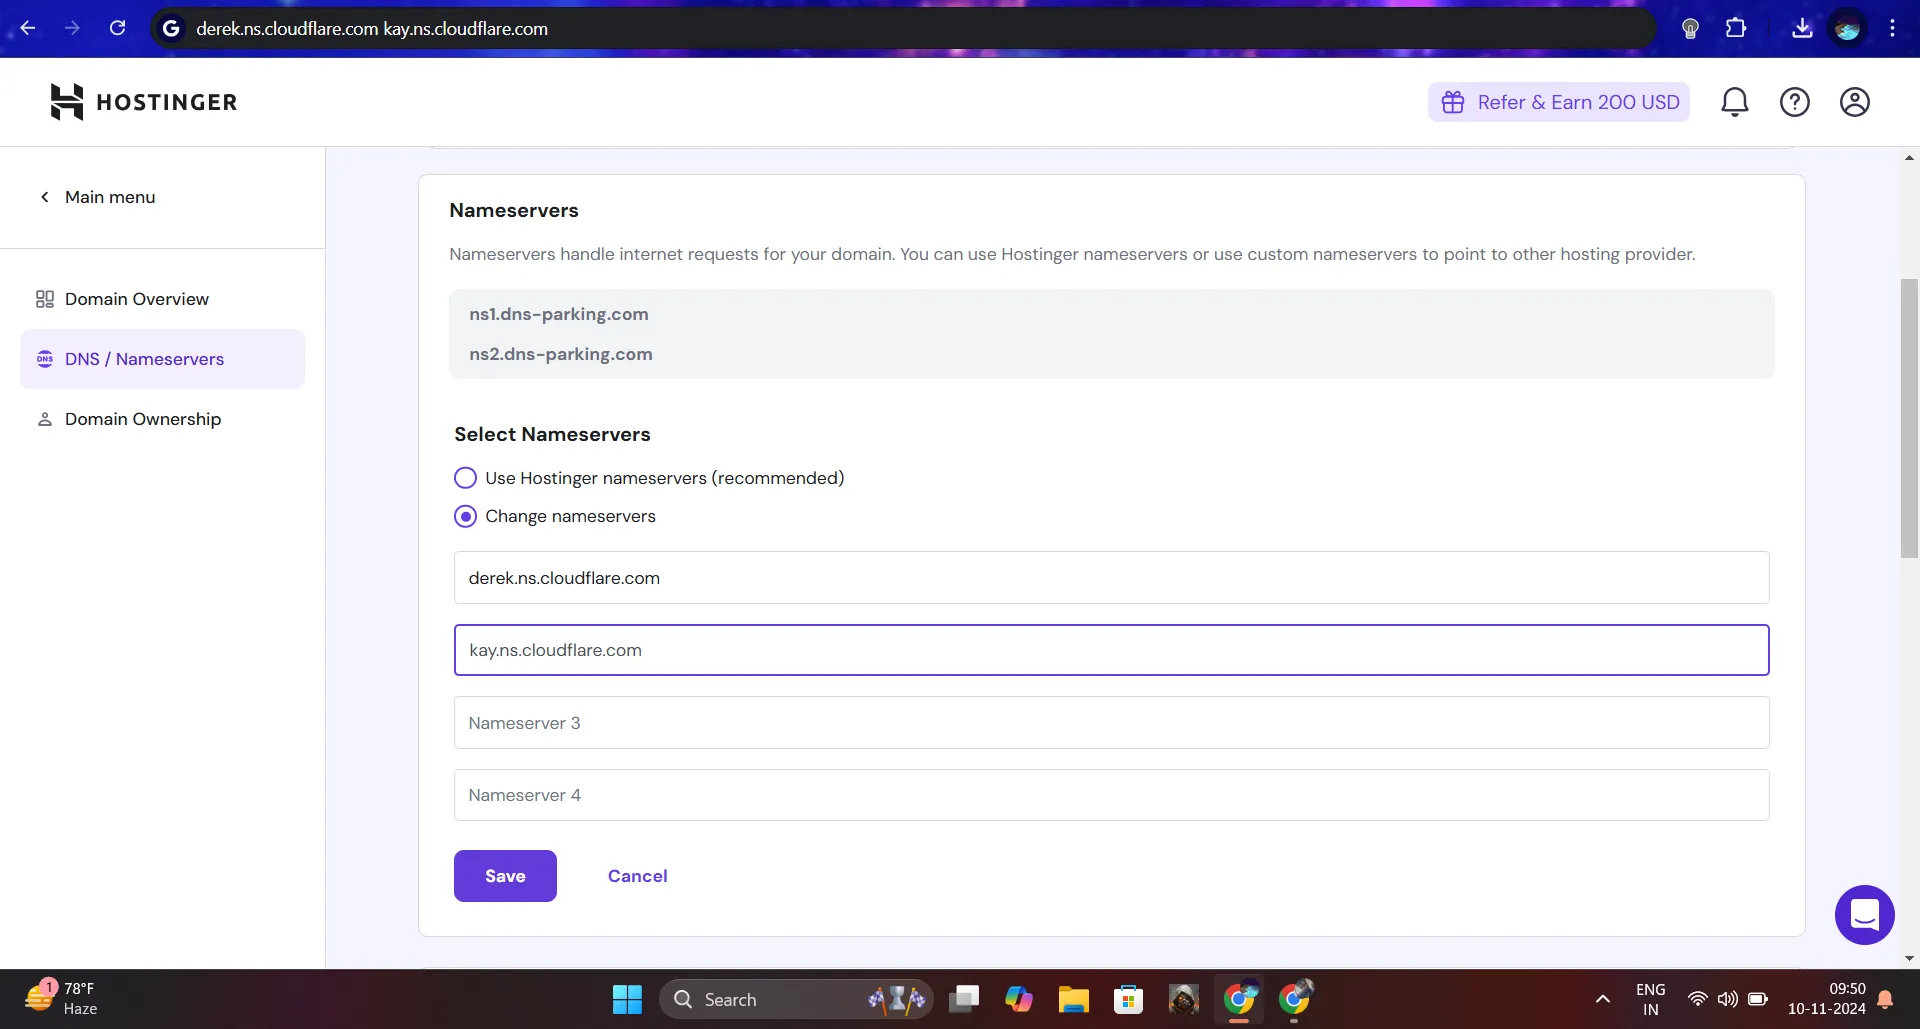
- Replace the default Hostinger nameservers with the ones you copied earlier from Cloudflare and save the changes.

- We’re done! Our domain account and Cloudflare account are all set up. Now we have to configure our Termux back again.
Step 6: Configuring the Cloudflare CLI in teru
Make sure you are still connected to your termux over ssh – if not reconnect to it.
Install Cloudflare CLI by running this command apt install cloudflared
Now we have to login to our Cloudflare, to do this execute this command
1 | cloudflared tunnel login |
The above command will generate a URL that needs to be opened in a browser to authorize your domain for tunnel.
Once logged in, you will see a list of your registered domains. Select the domain you want to use for the tunnel. E.g., webspacehub.in.
On clicking, it will popup asking for Authorization. So click on Authorize.
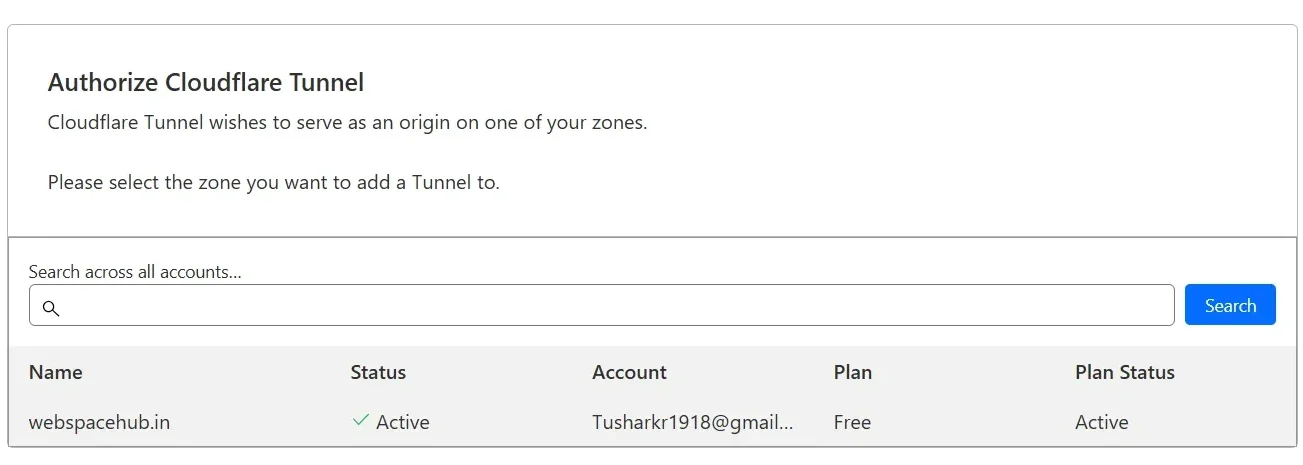
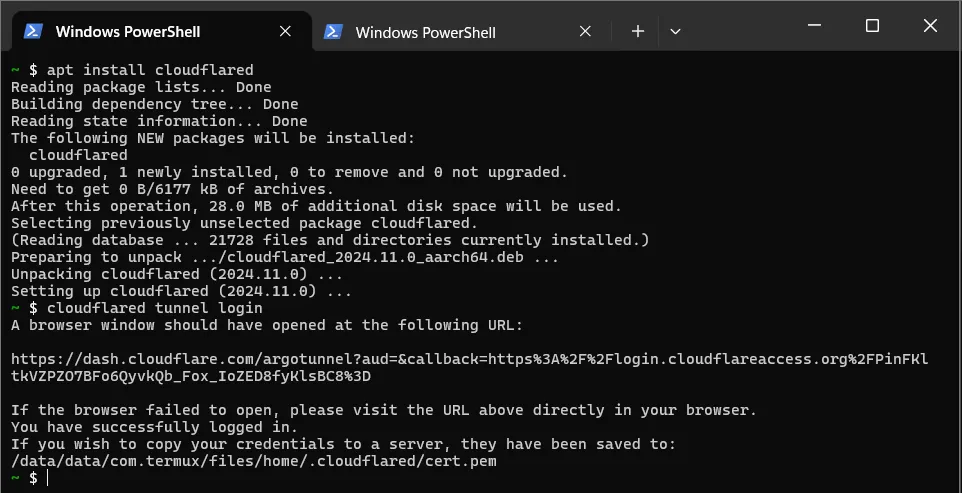
After successful login, Cloudflare will generate a cert.pem file, which will be automatically saved in the ~/.cloudflared directory in your Termux environment.
Now, we need to create a new tunnel. To do this, we will run cloudflared tunnel create eshop_tunnel. Here, eshop_tunnel is our tunnel name.
A tunnel is created and the JSON credentials file (named after the tunnel ID) will be saved in the ~/.cloudflared directory. Note the tunnel ID, as it will be used in the configuration file later.
If you would like to check your existing tunnels, you can run cloudflared tunnel list .
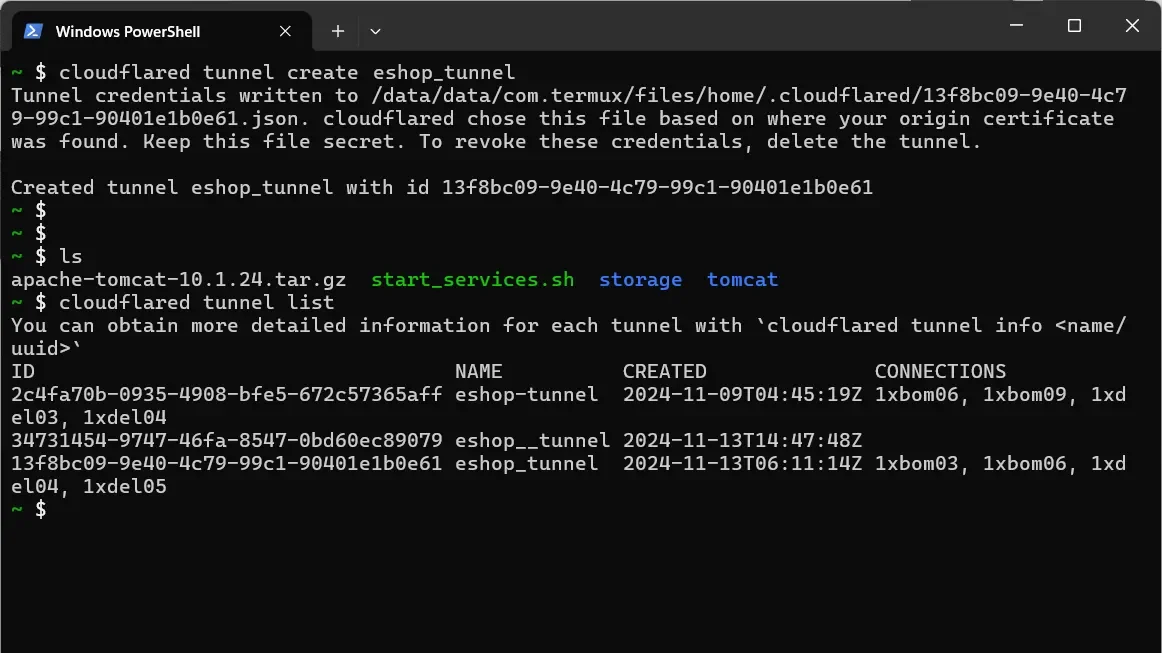
Next, we need to have a config.yml file in the ~/.cloudflared directory. This file is responsible for providing the credentials and configurations for our tunnel.

Inside the config.yml file, define the tunnel specific configurations in this format:
1 2 3 4 5 6 7 | tunnel: <tunnel-id> credentials-file: /data/data/com.termux/files/home/.cloudflared/<tunnel-id>.json ingress: - hostname: <sub-domain>.<base-domain> service: http://localhost:<port> - service: http_status:404 |
- tunnel-id: Replace <tunnel-id> with the actual tunnel ID you got while creating the tunnel.
- sub-domain: Replace <sub-domain> with any subdomain you want, like app, shop, or blog. But. try to be descriptive about what your web app does.
- base-domain: Replace <base-domain> with your actual domain name.
- port: Replace <port> with the actual port where your service is running locally (e.g., 8080 for a typical web server).
- http_status:404 is used as a fallback incase if no matching hostname or service is found, Cloudflare will return a 404 error.
To exit nano, press Ctrl + X, then press Y to save changes, followed by Enter to confirm.
Finally, we have to set up the CNAME record in our Cloudflare DNS for this and we are done configuring our Cloudflare.
Now, add the CNAME in the DNS record of Cloudflare. The subdomain and tunnel ID must match what you used previously in your config.yml
The format of the command must be like this:
1 | cloudflared tunnel route dns <tunnel-id> <sub-domain> |

If you accidentally added the wrong entry, you won’t be able to change it through the Cloudflare CLI. Instead, log in to your Cloudflare account, go to the DNS records section, find the record with that CNAME, and update it from there.
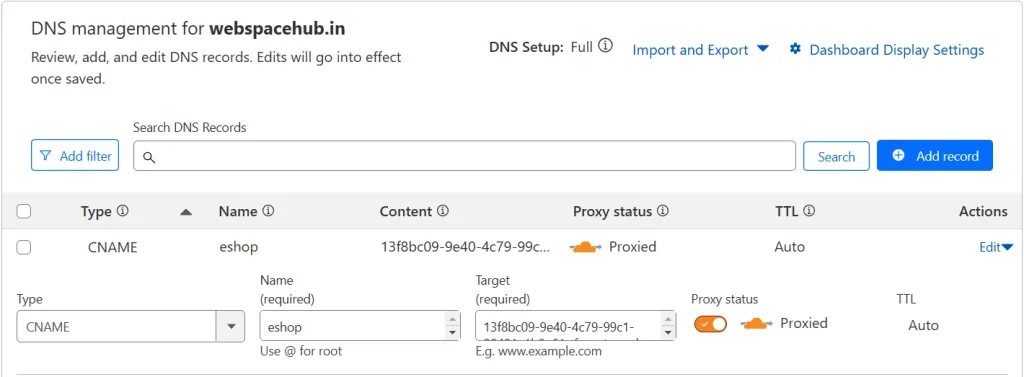
Step 7: Setting up storage for uploaded data
Now, we also want to store our user uploaded data, to do this we first need to grant storage permission to our Termux emulator.
Make sure Termux is open and not running in the background, like you should be able to see Termux on your smartphone screen.
Next, run the following command to request storage permission:
1 | termux-setup-storage |
Once you run it, you will see a prompt on your smartphone asking for permission. Click on Allow
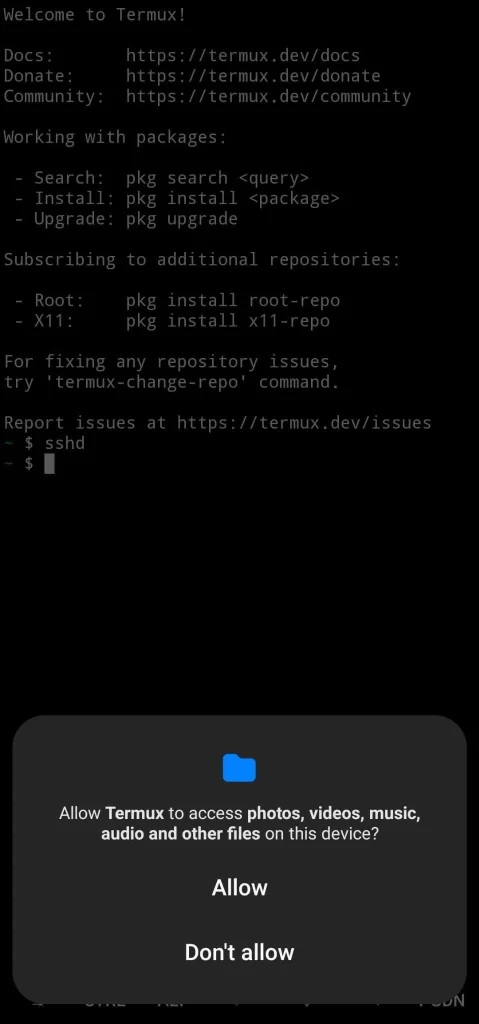
This will create a folder named storage in your home directory: ~/storage
If this doesn’t work then you can also manually allow the storage permission for Termux from the setting and rerun the same command.
Now, we have a storage folder which has symlink aka reference for both internal storage (phone storage) and external storage (SD card).
Here, eshop_uploads is the folder which we are going to create in our internal/external storage for our project.
- If you want to store your uploads in internal storage, execute this command:
- new_dir="$(realpath ~/storage/shared)/eshop_uploads"
- If you want to store your uploads in external storage, execute this command instead:
- new_dir="$(realpath ~/storage/external-1/../../../..)/eshop_uploads"
This command will create the directory based on your previous choice and print the relative path of the newly created eshop_uploads folder. I’ll be using the external storage to store my uploaded data.
mkdir -p "$new_dir" && echo "Directory created at: $new_dir"

After this, you need to use the path in your project. For example, earlier I was storing my upload data inside C:\Users\kumar\IdeaProjects\eShop\uploads but now I will be storing my data at /storage/9016-4EF8/eshop_uploads

Step 8: Making a simple bash script to start all the services
We have everything set up perfectly, but since we have multiple services that depend on each other, we’ll create an executable script to start MariaDB, Tomcat, and the Cloudflare tunnel all together in async mode.
nano start_services.sh && chmod +x start_services.sh
Inside start_servics.sh write everything as shown in the below image except the Cloudflare one there you have to use your own tunnel name.
cloudflared tunnel run <tunnel-name> &

Once you are done press Ctrl + X, then press Y to save changes, followed by Enter to confirm.
Step 9: Running the services
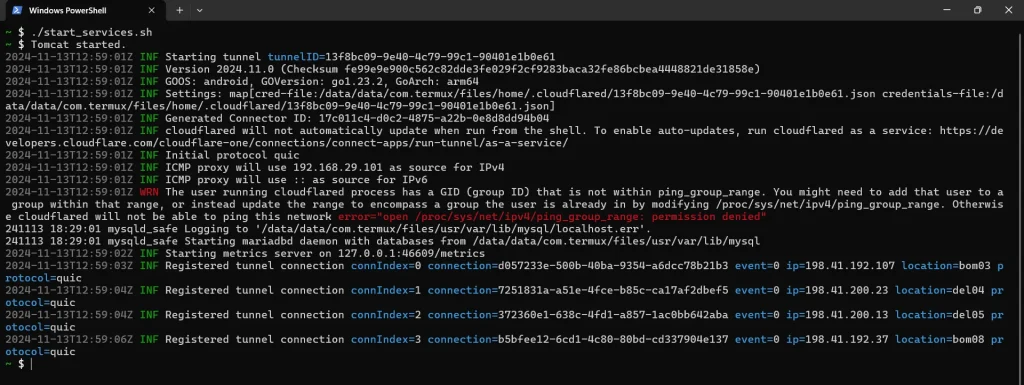
Now, all you have to do is start the services script we wrote by running ~/start_services.sh from your terminal. This will execute the script located in our home directory and initiate the necessary services for our web application.
Tomcat started successfully –
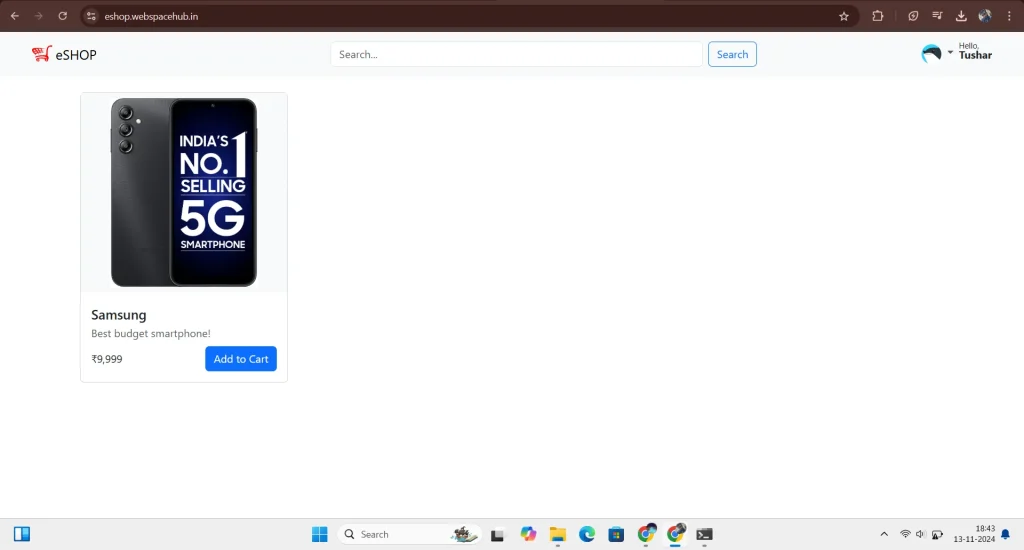
Our web application is accessible over the internet on the URL eshop.webspacehub.in –
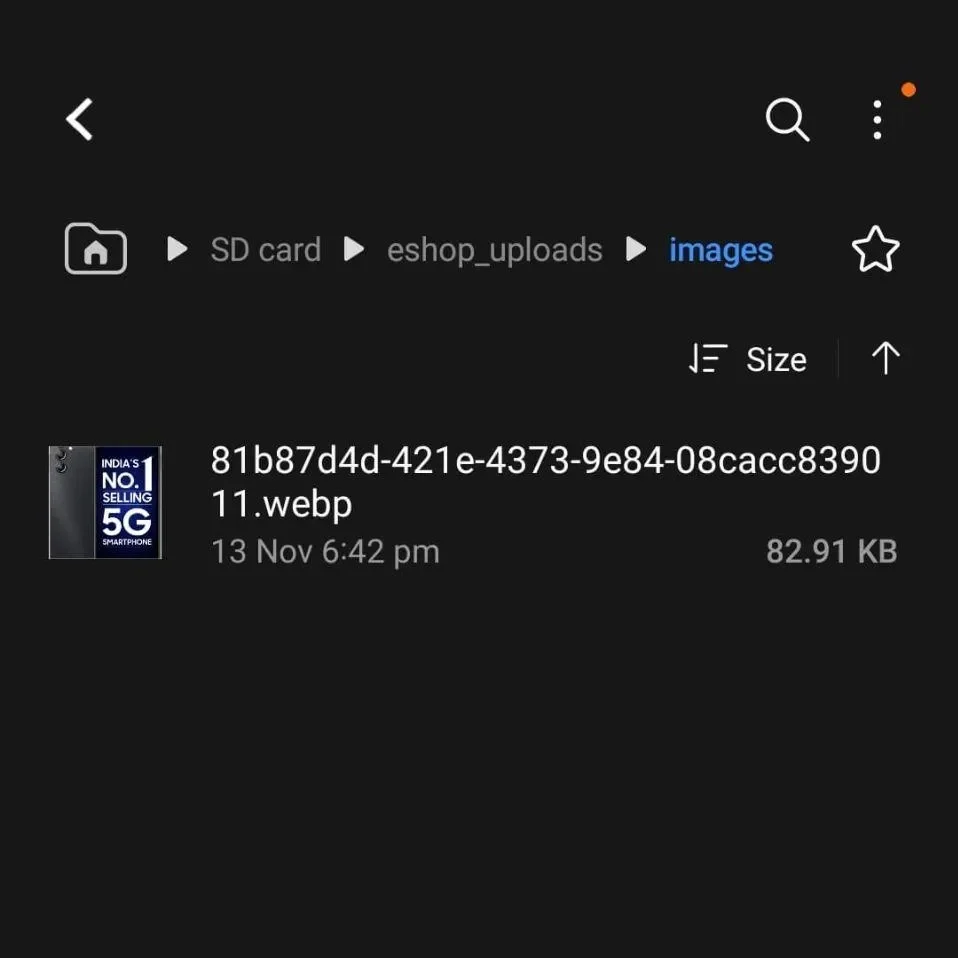
Files being uploaded are also successfully getting saved in our SD card,
within the eshop_uploads folder –
By using Tomcat and Termux, you can easily host Java web applications directly on your mobile phone for free. This method is not only practical but also demonstrates the power of mobile technology in modern development. Whether for learning, testing, or lightweight deployments, this solution is a great way to save costs and stay flexible.
Leave a Reply